Pool Leak Bucket Test: How and When to Do It
When you make the decision to become a pool owner, you likely do so under the assumption that you’ll be focusing a lot on the good times. You’ll think about those periods in warm summer days enjoying the weather with your friends and loved ones or going for a nice, relaxing dip in the pool after a hard day at work. You don’t want to devote a lot of your attention to an issue like a potential leak, but this, too, is part of the reality of the situation.
At GPS Pools, we find that many customers have heard of the fabled “Bucket Test” – but they’re not exactly sure how to conduct one or even what information it is supposed to unveil. In essence, it’s a way to determine whether your pool has a leak. The good news is that it’s not nearly as difficult to execute as one might think.
In reality, it’s relatively easy to figure out whether your pool has a leak, and in many cases, a leak as noticeable as you might assume. Because of that, people often confuse the issue with normal evaporation. Or, sometimes people are suspicious that they might have a leak, but they just aren’t sure how to confirm it. Regardless, getting to the root of this possible issue is a fairly straightforward process – one that requires you to keep only a few key things in mind.
Related Article: Leaking Pools: Where Do Most of the Issues Occur?
What Is the Pool Leak Bucket Test?
The beauty of the pool leak bucket test is in its simplicity. Using little more than a 5-gallon bucket, you can determine whether your swimming pool has a leak – thus putting you in the best possible position to do something about it.
To conduct the pool leak bucket test with your own swimming pool, simply complete the following steps:
- Verify that your pool is filled to the typical level. The waterline should be where it would normally be if you were certain that everything was functioning properly.
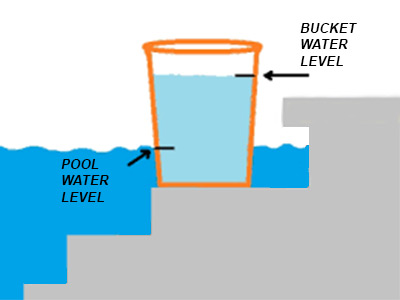
- Dip a 5-gallon bucket into the water. Fill it roughly 1 inch higher than the level that the pool water would be on the exterior of the bucket.
- Place the bucket on the steps of your swimming pool. Once it has been filled, take care not to submerse it in the water itself.
- Turn off all pool pumps and associated equipment, making sure that the pool will continue to function at the current level.
- Use marker or thin piece of duct tape to mark the water level on both the inside and the outside of the bucket.
- Turn the pool pump back on. Note that it is important not to engage any “auto fill” valve that may be present.
- Make a note of the amount of time that passes. Typically, 24 hours will be more than sufficient.

That’s it. During the pool bucket leak detection test, what you’re trying to track is the normal rate at which water evaporates. If the water level in your pool decreases at the same level as the water in the bucket, you don’t have a leak – or at least not a serious one that you need to worry about. If the water level in the bucket remains stable while the water level in the pool decreases at a faster pace, there is a larger issue that should be addressed sooner rather than later.
So if the water level in the bucket decreases by the same amount as the pool over a 24-hour period, things are proceeding more or less as they should be. If the amount of water in the pool declines by 4/16ths of an inch or more, while the same cannot be said of the water in the bucket, you’re likely dealing with a leak.
Note that there are a number of things you need to take into account during this process. Don’t attempt the pool bucket leak detection test during a period of heavy rainfall, as doing so will invalidate the results. Likewise, you don’t want to conduct the test over a period that is much longer than 24 hours, or this too could result in inaccurate information.
Related Article: Pool Leaks: Signs Types and Risks of Ignoring the Issues
Additional DIY Pool Leak Detection Options
While the “bucket test” is a simple method to determine whether your pool has a leak, it is not foolproof. If you’re concerned about the results that you see, and you want to verify them by using additional methods, there are a few key things that you can try.
Rubber Plugs with the Pool Leak Bucket Test
One method that you can use to confirm that your pool has a leak has to do with a product called a rubber plug. Note that this should be considered a separate test that is used in conjunction with the aforementioned bucket test. This will help you diagnose if the plumbing for your pool jets or skimmer lines is the cause of the issue so that you can quickly take corrective action. This process is important, as these are the two areas in which your pool is most likely to develop a leak over time.
After purchasing the appropriate rubber plugs remove all the eyeball fittings from your pool and insert the rubber plugs into all the lines leading back from the filter system. Once again, you will need to wait at least 24 hours. If the water level didn’t decline, any leak that you have is likely with the jets.
Next, remove the plugs from the return jets and put them in any skimmer that you have around the pool. After waiting 24 hours, return to the pool to see if the leak stopped. If it did, the larger issue you’re dealing with exists within a pool skimmer.
Based on what you observe, you’ll be able to tell if a specific section of the plumbing is or is not leaking. You will also be able to more accurately pinpoint where the leak is if you learn that one is occurring to begin with. It’s not going to permanently address the leak, but this process will give you actionable information to work with when calling in a professional to help out.
Related Article: How to Find and Fix a Pool Leak
Pool Dye Kits for Leak Detection
Pool leak detection kits that use dye will also be helpful during this period. First, go to the area of your pool where you believe a leak might be present. In a lot of situations, this will be an area surrounding the pool where an unusual amount of water has built up.
Then, pour the dye from the detection kit into the pool as per the original manufacturer’s directions. If a leak is present in the inner wall, for example, you should be able to see it move toward that portion of the wall, almost like a funnel. If you pour the dye into the pool and nothing happens, it means that the water is stagnant – indicating that a leak isn’t something you should be concerned about.
If you use a pool dye detection kit to determine that a leak is present, it can provide invaluable information because you can give it to a professional who will take further steps. You can show them precisely where the leak is, given the evidence that you’ve observed, allowing them to address the issue quickly so that you can use your pool again without worrying about any larger issues that may be taking place.
Related Article: Pool Leak Detection Kits: Do They Work?
What to Do If Your Pool Is Leaking
In the event that your pool is leaking, it’s important for you to know that this is one road you do not have to travel down alone. At GPS Pools, we offer leak detection services from our locations in New Tampa, Lutz, and Land O’ Lakes to the residents of Wesley Chapel, Pebble Creek, Tampa Palms, Odessa, Seven Springs, Lake Fern, and others, and are designed for this very situation – options that allow you to fix your leak no matter what caused it or where it is. At that point, you can rest easy knowing that your pool, your plumbing, and any related equipment are functioning as they should be, which is the most important benefit of all.

