

How To Use a Pool Testing Kit
Maintaining optimal water quality is a critical task for pool and spa owners, and knowing how to determine your pool’s water chemistry is the first step to crystal-clear water. A pool testing kit can take the guesswork out of pool maintenance, so you can spend more time enjoying your backyard oasis. Join us to learn how to use a pool testing kit and which types of kits can help you best care for your pool or hot tub.
What’s in a pool testing kit?
While you don’t have to be a scientist to interpret the results of a pool testing kit, you should be familiar with its components, including:
Reagents
Reagents are liquid drops or powders that change color when added to a water sample, indicating various chemical levels in your swimming pool.
Each reagent is specifically designed for a corresponding chemical.
Testing vials
These are clear plastic tubes or containers used to test pool chemicals.
Color charts
Almost every pool testing kit comes with a corresponding color chart that helps you interpret your results.
Specific tests
A comprehensive testing kit should assess the following chemicals in your pool water:
- Chlorine and bromine: Measure the concentration of sanitizers.
- pH: Indicate the acidity/alkalinity balance.
- Total alkalinity (TA): Buffers pH to prevent fluctuations.
- Calcium hardness: Prevents scaling and corrosion.
- Cyanuric acid (CYA): Stabilizer that protects chlorine from UV damage.
- Phosphates, iron, and copper: Affect algae growth, staining, and water clarity.
Related: A Guide to Pool Water Testing
How to use a pool testing kit
While each pool testing kit will include its own specific instructions, here’s an overview of the typical testing process:
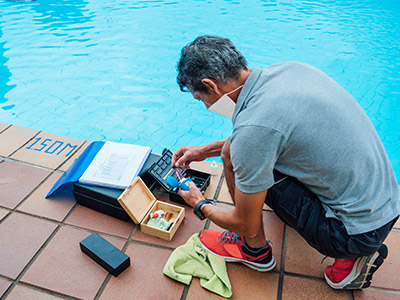
1. Take a sample of your pool water
Start by collecting a water sample from 12 to 18 inches below the surface. Be sure to take this sample from an area away from jets or skimmers to ensure an accurate reading.
2. Check the levels of the vials
Each pool testing kit indicates how much water should be added. Check your vial to confirm you have just the right amount.
3. Test for free and residual chlorine
Next, test the free and residual chlorine levels. Get the test kit’s chlorine reagent (often DPD or OTO) and add the appropriate amount to the sample. Swirl to combine thoroughly.
4. Mix the chemical solution
Gently swirl the solution until all the ingredients are dissolved. Your pool testing kit will indicate if you need to wait a certain amount of time to read the results.
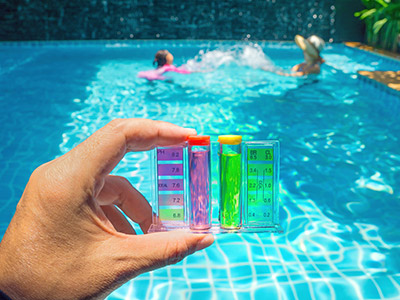
5. Compare results with the color chart
Analyze your vial against a white background for an accurate reading. The resulting color will indicate the amount of free chlorine in your water. Many kits include a secondary solution that you add to this same vial.
Count the number of drops it takes for the mixture to reach the appropriate color (sometimes this is clear). Use your findings to calculate the combined or residual chlorine concentration.
6. Test your pH levels
Now you need to test your pH level. Collect a new water sample and add the correct amount of pH reagent, allowing it to fully combine. Then, compare the solution against the pH color chart. The ideal range is 7.2 to 7.6, so you’ll need to fix your pH balance if it’s not within the ideal range.
7. Test for acid demand
Using the same sample you just tested, add the acid demand reagent one drop at a time until the water reaches the desired pH level on the chart. The number of drops required will help you calculate the amount of acid to add to the pool.
8. Check the total alkalinity
Next, use the same method to add the alkalinity reagent. Record the number of drops, and use the results to determine your pool’s alkalinity.
9. Clean up your tester
Finally, pour your water samples into the sink (not back into the pool!) and thoroughly clean each vial to prevent reagent buildup. As you put your kit away, ensure all components are dry and each reagent container is tightly sealed and stored away from direct sunlight.
Related: How To: Proper Water Balance and Testing
Types of pool testing kits to consider
Your local pool supply store is a great resource for the best pool testing kits. Here are a few popular options you’ll find from trusted brands like HTH, Taylor, and more:
Test strips
If you prefer not to deal with chemical reagents, you can opt for test strips instead of traditional liquid or powder systems. Simply dip each strip into your pool and compare the results against the accompanying color chart.
While test strips are convenient, they tend to be less accurate than other methods. Additionally, strips are highly sensitive to moisture and humidity, so proper storage is essential.
Liquid reagent kits
Liquid reagent kits are among the most popular types of pool testing kits on the market. They’re cost-effective and widely available. However, they require careful measurements and a bit more time to perform.
Digital testers
A great digital reader can eliminate human error from the pool testing process and provide highly accurate measurements with ease. You’ll pay more upfront for this type of tester, but many pool owners can’t imagine reverting to manual testing after enjoying the convenience these devices offer.
Saltwater test kits
A saltwater pool test kit is a must for testing salinity in saltwater pools. In addition to measuring salt concentrations, they also test chlorine levels, alkalinity, calcium hardness, and stabilizers.
Related: What Is a Pool Stabilizer?
Looking for the right product? Shop pool testing kits at GPS Pools!
GPS Pools is your ultimate resource for swimming pool maintenance and supplies. Whether you want help finding the right pool testing kit or you’d rather outsource the job to the professionals, we’re here to help! Reach out today to learn more.